If you’ve been wondering how to create a hosting package within your Reseller WHM, you should know it’s not that hard! Actually, it’s kind of simple and intuitive, if you just pay close attention. And also if you know where to look. But for those of you that don’t have the time to browse through WHM or read the guide (we know nobody reads it!) here we are with a helpful tutorial on how to manage your packages from WHM.
We’ll try to make things easier for you and not go into all the details at once, on how to create a hosting package within your Reseller WHM. Just because we have a feeling you’ll just get bored and close this article. And we don’t want that. So, we’ve got the steps needed to take listed below, and detailed later on.
- Login to your WHM
- Type Add a Package
- Configure the Package
- Create a cPanel account in WHM
- Assign the Hosting Package to the cPanel account
Login to Your WHM
You can usually login to your WHM using yourdomain.com/WHM
For example, if you have a website “domain.com” and you have purchased and assigned a Reseller hosting plan. then you will be able to access your WHM by typing domain.com/whm That is the easiest way to go.
Some web hosting companies, THCServers.com included, will offer you a server link which you can use to login to your WHM even before the DNS propagation is made. In order to login to your WHM, you will need the login credentials provided by your hosting company: the username and password. Keep in mind that although your WHM and cPanel username and password are the same, the panels are not. You will not be able to create reseller packages if you login to your cPanel. These can only be created through WHM.
Make sure your connection is secure while logging in, by using the port 2087.
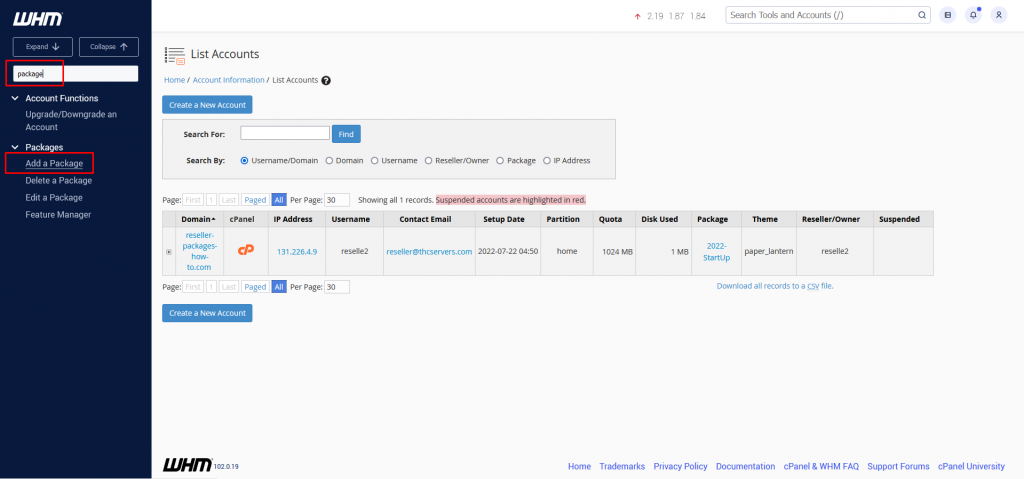
After you have logged in your WHM, you will find that you have just one cPanel account added in your whole Reseller account. That would be your main domain, the one associated with the Reseller hosting plan. It will have an automatically assigned quota of 1024 MB. If you wish to have a different quota assigned, you will need to create a new package for it.

Add a Package in Your Reseller WHM
In the search box, on your left, type “package”. You will see in the list “Add a Package”. Click on that. That will prompt you with the page where you will be able to create, configure and save your package.
Keep in mind that your reseller account is limited in resources, and that the overall cPanel accounts that are in use cannot exceed the total amount of resources that the Reseller has.
For example, if you will create 2 packages with, let’s say, 2GB and 8GB worth of disk space, then that’s a total of 10GB. Let’s also say you’re using a Start-Up plan, which has up to 10GB. Now, you want to assign the 8GB plan to a cPanel account. And you can do that. But, once it is assigned to that cPanel, you will not be able to assign it to another cPanel account. Even though the first cPanel is not using the total amount of disk space. That’s because WHM will see you are trying to allocate 16GB (2 cPanel accounts with the package that has 8GB assigned to it). Overselling your resources is not allowed.
But, you could easily choose to assign the 8GB package to a cPanel account, and then assign the 2GB to another one. But that would be it, you would only have 2 cPanel accounts under your Reseller plan. Instead of doing that, we recommend creating multiple packages with various resources – higher and lower.

Configure the Package
When configuring the package, you will need to choose a name for it. Try to make it relevant so it is easier to remember. I chose to include the keyword 500 Megabyte because I will be creating an account that has a limit of 500 Megabytes.
After you’ve named it, it’s time to configure its limits. You will have a list of options you can configure for your hosting plan, like number of email accounts, databases, addon domains and others. Each cPanel account that will have this plan associated with it, will have these resources assigned to it. It cannot exceed them. Once you’ve decided on the name and resources, all you need to do is click Save at the bottom. Now, you’ve created your first package. So, how to create a hosting package within your Reseller WHM is not such a hard thing after all!

Create cPanel Account
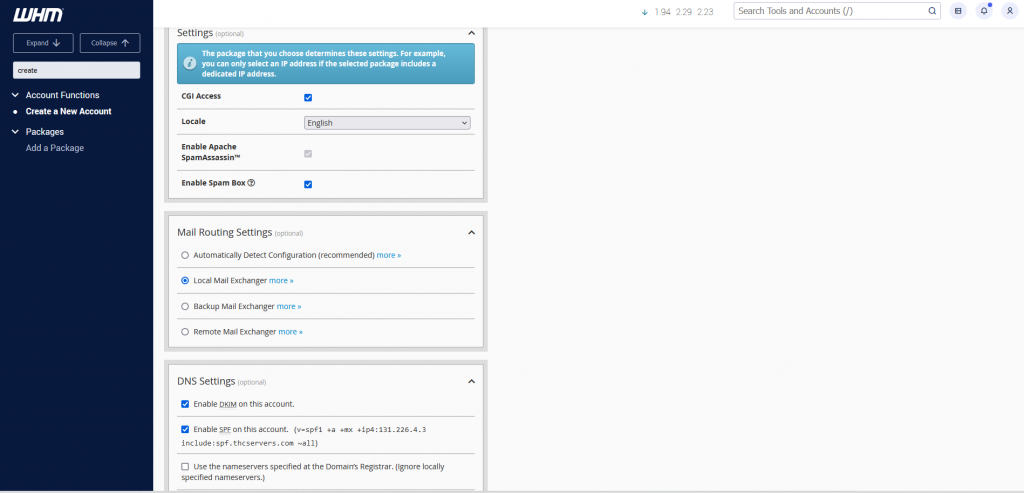
Once you’ve got your packages in place, it’s time to add clients. That means you will have to create the cPanel accounts under your WHM. This step is quite easy and it just involves a few clicks. You start by typing in the search box “create”. You’ll want to then click on Create a New Account.
Now you’ll reach the page where you can setup the client. On the top part of the window, you’ll see some information about your Reseller account. The total number of accounts is listed there, disk space used from the total space and bandwidth. Your Disk Usage Limit is calculated based on how much disk space all your accounts have been allocated and so is your Bandwidth. You can also see how many accounts you are able to create with each package you have – useful information to have every time you create a user cPanel account.
After typing the domain information, you’ll see the section where you can add the package you want to allocate to that cPanel account. Other settings will be available as you scroll down. Choose according to your client’s needs. Make sure to keep the DKIM and SPF enabled, as these are required for email authentication. Hit Create and you’re done creating your first cPanel account.


Assign the Package to cPanel account
If a client has changed his mind and wants to opt in for another package, it just takes a minute. You will need to go back to List Accounts and in the domain list, click the + sign for the domain that needs the change. Once the sign is clicked, you will see in the Actions section the button that reads Change Plan. Clicking on that will open the Upgrade/Downgrade an Account function. There, you just select the desired package and click Upgrade/Downgrade. And that’s it! The change in resources is automated and it doesn’t involve any downtime for the domain.


We hope this tutorial is what you were looking for. You can also find a video on our THCServers.com YouTube channel. And if at anytime you encounter issues with our Reseller plans, never hesitate in reaching out to us! Have a great one!


