How to Install WordPress in cPanel
Most webhosts will offer cPanel for managing your hosting account. cPanel is a user-friendly web hosting control panel. It has several useful features and allows you to manage each and every aspect of your web hosting account. In this tutorial we will look at how you can install WordPress in cPanel. There are lots of different ways of doing this. For example, by uploading WordPress through FTP, or by uploading WordPress through the file manager or by using Softaculous. As the Softaculous method is the most efficient and easiest, we will cover that in this tutorial.
Step 1: Login to your cPanel
Login to your cpanel account by visiting www.yourwebsite.com/cpanel enter your username, password and click on login. Remember to use your domain name instead of yourwebsite.com
If you don’t remember your login credentials, then you can ask your hosting provider to resend them.

Step 2: Open the Softaculous apps installer
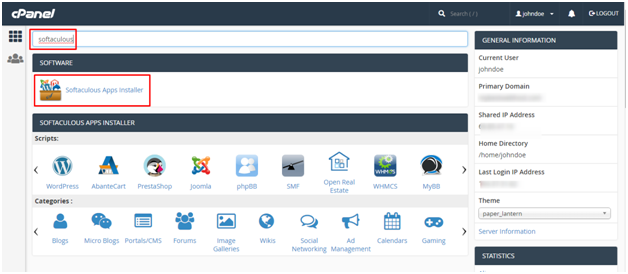
Search for softaculous in the search bar and click on Softaculous Apps installer. If you cannot find it in your cPanel, make sure your hosting provider has this feature enabled on the servers.

Step 3: Begin the WordPress Installation
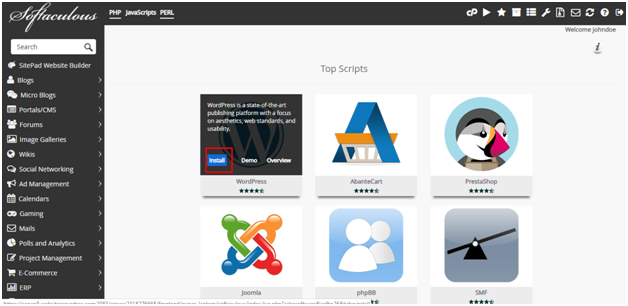
Once you have access to Softaculous, you can either search for WordPress in the search bar, or you might find it listed in the Top Scripts. Hover your mouse over WordPress and click on the Install button. That will open the installation page.

Step 4: Configuring the installation
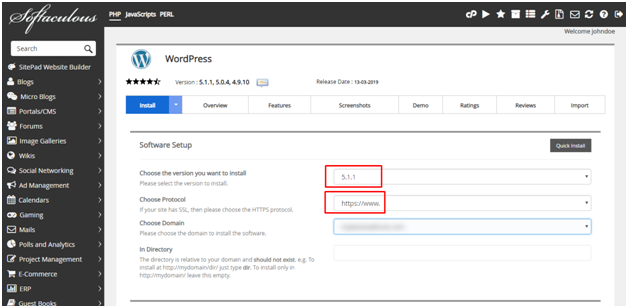
From the next screen select the version that you want to install. It is always advisable to install the latest one. Select the protocol that you want to use i.e http, https, http www or https www, if you have an SSL certificate https is highly recommended. Also, make sure the WordPress version you decide to install is compatible with your current PHP version.
Select the domain that you would like to use for this installation. You can also select a sub domain if you want to install WordPress on the sub domain.
If you wish to install WordPress in the root directory leave the directory field blank.

Scroll down and setup the Site name, Site description, admin username and admin password in their respective fields. Remember to use a strong password for your admin user.

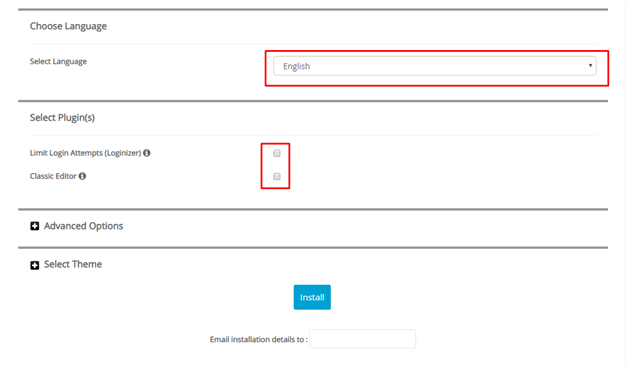
In the next section you can select the language for installation and if you need any additional plugins. There are 2 plugins you can select to install here:
- Limit Login Attempts will block a user if they have multiple failed login attempts.
- Classic editor – WordPress version 5 and above come with the new Gutenberg editor. If you would like to use the classic editor, you can install this plugin.
For this example, we will not install any of these plugins. But, adding the Limit Login Attempts plugin is highly recommended.

Under the advanced section you will find a number of options

For the database name and prefix, leave the default values. Other options here include disabling email notifications, enabling or disabling auto upgrades for WordPress and plugins, you can also setup automated backups.
In the next section you can select a WordPress theme to be installed. You will need to search for a suitable theme and view a demo. Click on Search to search for a suitable theme.

Type in suitable keywords to search for a theme. You can select a theme that you like from the search results and view a demo of the theme by clicking on demo. Click on Select theme once you have a theme that you like. You can always change the theme later.

After you have selected a theme, your selection will show as follows

Finally click on install. You can enter your email if you want a copy of the installation details.

The installation can take a few minutes to complete

Once completed you will receive a similar confirmation as shown

You can now visit your website and confirm WordPress has been installed.

At first it may seem like a complicated method to install WordPress in cPanel. However, this is the easiest method to install WordPress with Softaculous. You can easily skip through the advanced section to make the process easier. Other methods involve downloading the WordPress installation files, uploading them through FTP or through the file manager, creating a database, creating a user, adding a user to the database and then running the WordPress installation.
If you’re looking for a hosting plan to accommodate your website, you should choose a WordPress hosting plan. Why? Because WordPress hosting plans are configured to boost your website’s speed and overall performance. If you’re happy with your current hosting provider, ask them if they have any plans built for WordPress.


